Tuesday, December 25, 2012

looking at Youtube- color and overlay layers

I was watching you tube today and saw a way to color images that are rendered in black and white using a color and overlay layer at low opacity- so I decided to give it a try on this quick render-it works but as stated the render layer must be filled completely so it won't color spotty.
I still needs some work on my rendering but I got a sense of form- gotta keep working... enjoy sasquatch- will make the next one a progressive...

Thursday, December 20, 2012

just sketching

just sketching while listening to schoolism interview with william stout

Friday, December 7, 2012

color composition- face progression


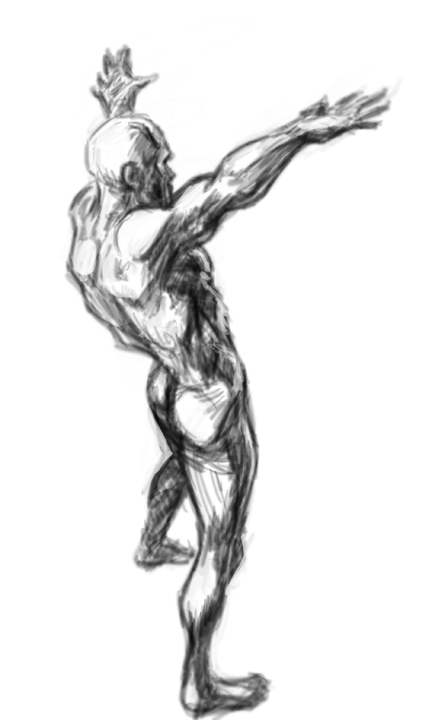
Okay, I was racking my brain to determine a way to put out color compositions with clean enough lines and rendered colors adequate enough for presentation storyboards. I looked on several websites of working storyboard artists.   Some were really sweet, with nation-wide contacts and references and some were not  so sweet but consistent and clean.   In other words, art varies greatly from person to person.  I figured out, then and there, that I needed to devise a method for me that works with my style and will be considered world class... Sweet,clean, and consistent.... The following progressive is my first attempt at getting this look- step1: create non-white background-2 Sketch a face loosely and do feathering as needed to identify planes of the face that will be rendered in color- 3 tighten up features that will be described as line later- ie not all cross-hatching should be tightened up- the idea is less lines are more- 4 -finish line in black  (100% opacity, 100% flow)- idea is economy of lines-5 create a color render for the face- effectively I selected the face alone and use big brush strokes  ( at low flow) for main tint and shadow-highlights were done with smaller brush- following the crosshatched lines denoting the planes of the face. 6 placed hair on the image ( this I still need to work on but the idea was work with 2-3 colors for the hair. 7 the last stage is hide sketch layers for finished look

Sunday, December 2, 2012

anatomy-sketch- mistake check

As stated earlier I have some size issue i have to work out- as can be seen in the animated gif of two alternating images on a nude i did yesterday- sorry yes nude- aside for the nudity you get the drift of areas i need more practice in- I will be going through a couple of anatomy landmark studies to hopefully eliminate this issue...

anatomy sketch 1 progressive- up to clean up contour

I was finding out my characters were looking a little wonky- such that if i were to try and finish them at a their current stage- they would look skewed, or out of proportioned- i was told by one of my instructors- I have a size problem- hands and feet and head would be too large or make my perspective ambiguous or feel flat. so  using photoshop I have found out i can correct my feature size issue but it would take me more than one or two tries- ie with modification I kept getting better- I just need to determine when good enough and time constraint merge and go with that- here is my first anatomy progressive- as you can tell features change and morph as I refine- I am still trying to use the methods Loomis lays down in his books

progressive- study/ the flat diagram

I saw this cool feature on a website showing progressive steps on getting to a finished or more advance point in a WIP- so since I am practicing on this web and need as much encouragement to complete assignments- I decided to post them here- in this post I am trying to identify using flat diagrams for placement and angle view of a character- This idea is emphasized in Andrew Loomis Drawing The Figure for All Its Worth which -from this book and other Loomis books -where I will be trying to upgrade my skills in preparation for a new portfolio- so here goes

car render-sample

I looked at presentation storyboards and the need to be able to draw,render and color cars is a must- which I have tried to stay away from as long as I have been drawing- so to say the least I am not good at it- so here is my starting point- hopefully after a few of these i can be better equipped to tackle any assignment involving creating cars for advertisement purposes- i know i will need to create CG versions as well to find a more secure niche- but I will stop rambling- here is my first try at this thing- heavily dependent on photoshop.  I traced my rough drawing- copied from a photograph- I suppose I could have just traced the photograph- but if i needed to draw the vehicle in different positions- I would have had to hunt down reference that showed a view to trace and that would take me longer than I have- so alteration and guess-tamation ( is that a word) are my current keys- sorry all you vehicle guys out there- I know this is sloppy on the rendering and perspective- but its a start
peace